Showing posts with label Misc. Stuff. Show all posts

Tuesday, February 26, 2019

Pork and Veggie Stuffed Egg Rolls

Click on Image to Enlarge
Hot Mustard:

1/4 cup boiling water
1/4 cup dry Colman's mustard powder
1/4 tsp salt
2 tsp veggie oil

Using a whisk the mustard powder into the boiling water until smooth. Add in the salt and oil and mix until combined. 

Sweet and Sour Sauce:

1 cup pineapple juice
1/3 cup water
3 Tbsp vinegar
1 Tbsp soy sauce
1/2 cup packed brown sugar
3 Tbsp cornstarch

Combine all ingredients in a sauce pan and cook on medium heat until thick, stirring all the while.

The Filling:

1 Tbsp veggie oil
1 1/2 cup shredded carrot
3 cups cabbage chopped
1 tsp minced garlic
2 tsp dried ginger
1/3 cup green onions
4 tsp soy sauce
1/2 tsp sesame oil
1 large egg white whisked
1 cup chopped fresh mushrooms
8 ounces of ground pork
12 egg roll wrappers, 7" x 7"
Veggie oil - enough to fry the the egg rolls

Heat a wok or large pan over medium heat
Add the oil and fry the pork and drain of any residual oil if necessary
Add the mushrooms and saute for 1 minute
Add the carrots and saute for 1 minute
Add the cabbage and cook until well wilted
Add the garlic and ginger and saute for 30 seconds
Add the soy sauce and sesame sauce and stir to combine
Remove from the heat and let cool

Then stuff your egg rolls.


Sunday, February 24, 2019

Beurre ManiƩ - The Roux in Your Freezer

Click on Image to Enlarge


Often when making a soup or stew you may find that you really need to thicken it up a bit so you make a flour slurry or add in a cornstarch mixture.

Clearly, this will thicken the soup or stew but there is a tasty and simple alternative and that is Beurre Manie which is nothing more than equal parts butter and flour by weight and kneaded together. Think of it as an uncooked roux that you use in the final stages of cooking instead of before as with a traditional roux.

Note: In my original posting, I did not mention that you needed to knead the two together simply because there are only 2 ingredients and the pic would suggest that they were combined. Since then I added the word [kneaded] because my favorite x-wife Rita wasn't sure what she should do with the 2 ingredients. Thanks Rita for pointing this out and I'm sure that it will make a meaningful difference in the finished product. LOL

How I prepare it is by spreading 1/4 stick of semi-softened butter on a cutting board so it look similar to a pancake and then sprinkle 4.5 ounces of flour on the top. 

Then with a heavy-duty dough scraper or the back of a broad-bladed knife combine by scraping the butter from the bottom onto the top of the flour and keeping working it. Then simply knead it by hand as if you were kneading dough. This is so much faster and less messy than trying to do it in a bowl with a spoon or knife.

Or, you certainly could put the butter and flour in a small food processor and pulse until blended. 

After it is combined flatten it to about 1/2" thick then cut 1/2" squares and place them in a plastic freezer bag. And yes Rita, this would be the time to put them in the freezer.    


Zucchini Quiche

Easy to make and quite tasty but the next time I make it I'll up the temp to 375 and cook it for 35 to 40 minutes.

Click on the link for the recipe. Zucchini Quiche

Wednesday, July 25, 2018

Fried Rice


1 tablespoons butter
2 Tbsp Veggie Oil
3 eggs, scrambled 
12 ounce pack of frozen carrots and peas thawed
1/2 small onion, small dice
2 cloves garlic minced
4 cups cooked and chilled white rice
2 1/2 tsp Soy Sauce
2 Tbsp Oyster Sauce
1 tsp Sesame Oil
1 Tbsp Hoisin Sauce
pinch of red pepper flakes...optional
Chopped green onions for garnish...optional

Heat 1 tablespoon of butter into a large skillet

Add the eggs and scramble until fully cooked, and set aside in a bowl or on a plate.

Add the oil to the pan.

Add carrots, onion and peas and cook until tender, 3-4 minutes

Add garlic and pepper flakes cook for 1 min

Add the cold rice and fry at med-high heat for 3-4 minutes.

Add the cooked eggs into the pan and stir in soy sauce, oyster sauce, hoisin and sesame oil

Cook for an additional 1-2 minutes until hot

Adjust for flavor

Garnish with green onions 

NOTE: Add in cooked meat or seafood at the same time as the garlic and pepper flakes if using.  

Saturday, May 12, 2018

Green Peppers Stuffed with Beef and Rice Recipe


The Sauce:

1 tablespoon olive oil

1 onion, diced

1 cup beef broth

2 cups prepared marinara sauce or other tomato sauce

1 tablespoon balsamic vinegar

1/4 tsp red pepper flakes, optional

The Peppers:

1 pound lean ground beef

1/4 Lb. Italian bulk pork sausage 

2 cups cooked rice

1 cup finely grated good-quality" Parmesan cheese

1/4 cup chopped Italian parsley or (2 Tbsp Dried)

4 cloves garlic, minced very fine

1 can 10-oz Mild diced tomatoes w/green chilies

2 tsp salt

1 tsp freshly ground black pepper

4 large green bell peppers


Brown the onions in olive oil and reserve half of them. Add beef broth, marinara sauce, vinegar, and hot pepper flakes. Stir to combine and pour into a deep baking dish.

Par boil the peppers until they soften but still retain their shape.


Add the meat, cheese, garlic, diced tomatoes, parsley, and reserved onion in a large mixing bowl. Stir to combine with a large spoon or mix by hand. Now mix in the cooked rice and cheese.

Cut the peppers in half lengthwise, clean each half of the seeds and pith, and pack tightly with the meat and rice mixture.

Place the peppers in the baking dish on top of the sauce, sprinkle some additional Parmesan on the tops of each pepper, and cover with aluminum foil.

In a preheated 375-degree oven bake for 45 minutes. Then remove the cover and cook for an additional 20 minutes.

Remove the peppers to serving plates. Spoon the sauce from the baking dish over the peppers and...

Enjoy!


Thursday, June 1, 2017

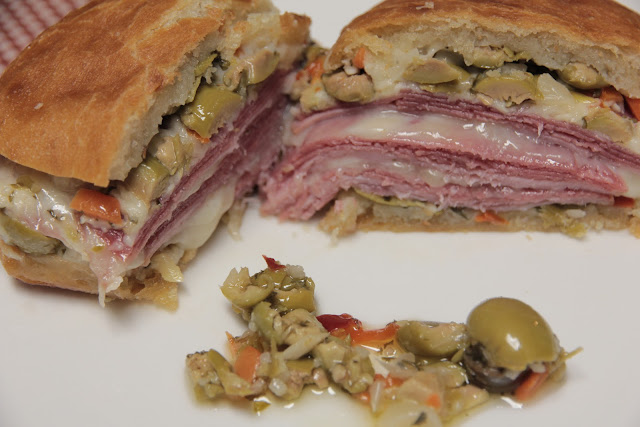
Muffuletta (muffaletta) Italian Sandwich Recipe

Muffaletta
Click on image to enlarge
In terms of its primary ingredients, the very flavorful muffuletta sandwich is not much different than an Italian submarine sandwich, aka, a hoagie or Po Boy.

The traditional muffuletta replaces the condiments like tomatoes, lettuce, peppers, etc. with Italian olive salad.
So what is Italian olive salad?

Well my favorite is Boscoli brand who lists its ingredients as a medley of pickled cauliflower, carrots, celery, green olives, black olives and capers, combined with our special blend of spices and select oils. Note that green olive is the primary ingredient … hence the name – olive salad.


What you will need:
Nice crispy bread
ham
salami
provolone cheese
mozzarella cheese (optional)
Italian olive salad
Before you build your sandwich, spread several tablespoons of the olive salad on both the top and bottom halves of the bread. Cover and let the oil and penetrate into the bread for one hour turning over after 30 minutes.
Then layer the meats and cheeses in the proportions you decide. I like to put down a foundation of ham and salami, then slices of each of the cheeses and continue upwards.

You can eat a muffuletta at room temp or warm in the oven. I always warm mine so you have to build the sandwich on a large sheet of aluminum foil and then seal tightly.

Place the sandwich onto a baking sheet and then into a preheated 400 degree oven for 45 minutes or until the meat is warm and the cheese has melted. Even better, insert the probe of a corded digital thermometer sideways through the foil and into the center of the sandwich. Set alarm for 135 degrees.

Unwrap, slice and enjoy!


Tuesday, January 24, 2017

Homemade Pizza

Click on Image to Enlarge

This recipe is for a 14" pie.


1/2 Green Bell Pepper sliced in rounds and wrapped in paper towel to absorb the excess water
1/2 can large whole ripe (black) pitted olives (wrap in a paper towel)
Thinly sliced Onion if you like - wrap in paper towel
14 ounces low-moisture mozzarella cheese
8 oz Italian Sausage - casing removed
4 oz. Pepperoni, thinly sliced
8 oz. fresh white mushrooms sliced in half
Freshly grated "quality" Parmesan cheese grated
Olive Oil (not virgin)
1 tsp dry Oregano 
1 tsp Hot Pepper flakes
28 ounce can of tomato sauce (this makes enough for 2 pies)
2 Anchovy fillets or 1 tsp paste
4 Cloves garlic
Sugar

The Sauce:
Saute - 
 3 Tbsp olive oil
2 Anchovy fillets or 1 tsp anchovy paste
4 Clove garlic, minced
1 Tbsp dried oregano 
1/4 tsp hot pepper flakes
1 - 28 oz. can whole peeled tomatoes crushed by hand 

While simmering add:
1/2 tsp sugar
1 very small pinch of baking soda 
Salt and pepper to taste
Simmer for 30-45 minutes

Place the dough on a pizza pan and lightly brush dough with olive oil and then the sauce. Top the pizza with the cheese, strategically place the pepperoni on the pizza and place "small globs" of the uncooked sausage between the pepperoni slices and spread out the veggies on top.   

In a 500 degree preheated oven place with the rack in the middle position cook the pizza for 15-20 minutes until hot and bubbly and the crust is crispy (mandatory).

When done, remove the pizza pan onto a trivet to cool and to give the pizza time to settle...about 5 minutes. Then remove to a large cutting board, sprinkle with the Parmesan, slice, and serve.

DON'T BURN THE ROOF OF YOUR MOUTH!


Saturday, April 2, 2016

Cream Corn Recipe

Cream Corn

Cream corn has never been one of my favorite side dishes but after having a bowl full at a Houston BBQ restaurant I have been convinced otherwise. 

I made mine according to the recipe posted on Allrecipes.com but with a pinch each of Tarragon and Rosemary. 

Tuesday, April 14, 2015

Scotch Egg Recipe


In all honesty, I had never heard of Scotch Eggs before I saw them on Chef John's food blog but I immediately knew that I had to make them even if it were only for the experience.

In a nutshell, Scotch eggs are (at least in this case) steamed eggs with the shell removed, covered with Italian sausage, then rolled in flour, egg and Panko bread crumbs and fried one at a time in vegetable oil. 

At first blush you may think that it would be difficult to engulf the egg in a protective covering of sausage without piercing them but it really isn't all that difficult if you practice a little patience. 

Accompanied by a sauce consisting of mayonnaise and Dijon mustard this is a rich, savory and crispy treat.  Be careful when you go in for your first bite 'cause that pretty egg yolk can be as hot as molten lava. 

Ingredients:

6 large eggs from the fridge steamed for 6 minutes for soft yolks, peeled

1/2 cup, about 3.5 ounces of bulk Italian Sausage
for a total of about 21 ounces
A pinch of nutmeg
A pinch of cayenne
1/4 tsp of mustard powder
White flour
2 eggs beaten
and enough panko breadcrumbs to bread the eggs 

The Sauce:
One part mayo, one part Dijon and a sprinkle of cayenne. 

Procedure:
Steam the eggs, chill immediately in cold water and GENTLY peel and let cool. 

Take the sausage and mix well with the spices then with about 3.5 ounces of the sausage mixture spread out into a flat patty, place the egg in the center and with wet hands wrap the sausage around the egg.

Gently all around the egg until the egg is completely and evenly sealed by the meat. This may sound difficult but it is actually not. It's actually therapeutic in an odd kinda way.

After the egg and sausages have been formed, roll them in flour, then in the beaten egg and finally in the breadcrumbs. 

Heat a fry pan with sufficient amount of veggie oil to cover the eggs by 1/2 to 350 degrees and fry until browned, about 5-6 minutes and then plate and serve with the sauce.   

I found this to be a very rich meal so I found it to be satisfying served with a garden salad. 


Monday, October 13, 2014

CrĆØme FraĆ®che (creme fraiche) Recipe

Click on Photo to Enlarge

Making CrĆØme FraĆ®che is as difficult as adding sugar to your coffee or tea...seriously!

But what is CrĆØme FraĆ®che?  Essentially it is a mild tasting sour cream but with a dose of sophistication. 

Why should I make it.  Well there are two reasons.  First look at the ingredients of your store bought sour cream and the second reason is that you can use it like sour cream but it won't curdle when added to hot gravy's, soups or the like.  And thirdly, it's really cool to make something on the cheap that costs big bucks at the grocery store.   
 
Recipe:
2 cup heavy cream "pasteurized," not "ultra-pasteurized" 
3 Tbs cultured buttermilk

Gently stir the two ingredients together and let sit on your counter in a warm place for about 24 hours with a loose covering such as a paper coffee filter or paper towel. 
Cover and refrigerate for a 24 hours.   
That's all folks!
If you want to know what you can make with CrĆØme FraĆ®che try this link.  


Thursday, April 10, 2014

Homemade French Fries (Cooks Illustrated)

From CI's America Test Kitchen...no variations to the recipe please...none at all!

1.  Use only Yukon Gold potatoes, don't remove the skin
2.  Slice into 1/4 x 1/4" planks
3. Place the fries into a pot and cover with room temp Peanut Oil and add some bacon grease for superior taste if available
4. Turn burner on high until the oil is boiling 

5. Start timer and don't touch the fries for 15 minutes!

6. After 15 minutes gently stir the fries frequently taking great care not to break the fries for an additional 10 minutes
7. Remove the fries to drain on paper towels and sprinkle with salt, vinegar, Cayenne or whatever you want. 

Sunday, November 3, 2013

Homemade Tartar Sauce Recipe


1/2 cup good quality mayonnaise
2 tablespoons finely diced pickles
1 tablespoon white wine vinegar
1 tablespoon finely diced capers
1 teaspoon coarse grained mustard
Pinch freshly ground black pepper

For best results, mix all ingredients and refrigerate for at least 1 hour.


Monday, September 30, 2013

Salt is Salt...right?

I asked Cooks Illustrated what the differences are between table salt, sea salt and kosher salt.  This is what they said...

What distinguishes one salt from another is texture, shape, and mineral content. Table salt usually includes anti-caking agents that help it pour smoothly. Kosher salt has larger grains and does not contain any additives, and sea salt is rich in minerals. 

We use kosher for seasoning meat and table for most other applications. Sea salt, much more expensive, is not worth using unless you want to add it as a "finishing salt" to add a delicate crunch. 

That said, use Kosher salt for salting meats and just about everything unless your recipe calls for a particular measurement of salt.  In that case, use table salt.  

Monday, July 29, 2013

Tuna Melt Sandwich Supreme


Click on Photo To Enlarge

There are tuna melts and then there are tuna melts and this one was off the chain.


2 Slices of quality bread (I used Pepperidge Farm Sourdough)    
2 Slices premium crispy bacon
1 1/2 slices of American cheese
Thinly sliced tomatoes seeds removed
Gulden's Spicy Brown Mustard
Dill pickle slices
Capers

The Tuna:  

Kirkland (Costco) solid white canned tuna (Albacore) in water
1/2 lemon
1 Tbsp diced onion
2 Tbsp diced celery

Spread the tuna in a piece of toasted bread, scatter the bacon on top as well as the pickle slices and a few dollops of mustard (maybe fewer than pictured). Make sure that all of the bread is covered with the tuna mix otherwise the bread will burn. 

Place under broiler (second rack from the top) to heat/warm the tuna, etc.


Remove and add the tomatoes and put back in the oven to heat/warm the tomatoes

Remove once again when the tomatoes are warmed and add the cheese returning it to oven...turn off the oven and pop another slice of bread in the toaster 

Remove the sandwich from the oven, spread some mayo on the bottom side of the remaining piece of toast to complete your sandwich.  Enjoy! 


Note: The next time I'll strategically place a few whole capers on top to the tuna like I did here with the mustard and bacon.

Sunday, July 28, 2013

Barr's Homemade Mayonnaise

Click on image to enlarge
1 Whole Large Egg + 1 Yolk 
2 TBS White Wine Vinegar (Not distilled)
1/2 tsp fine grain salt
1/4 tsp sugar
1 - 1/2 Cup Vegetable Oil 
1/2 heaping tsp powdered mustard

In a beaker, add the oil, then drop the eggs so they settle into the bottom. 

Then add in the remaining ingredients and let stand for 20 minutes. 

Submerge a stick blender to the bottom of the beaker and pulse on high speed until the eggs and oil begin to emulsify.

Then raise and lower the blender emulsifying the remainder of the liquid which by now has gotten very thick. 

If there is a little oil on the top just hand mix it in with the rest, use immediately or place in an air tight container and refrigerate.    

If you are wondering how long your mayo will last in the fridge I can't say for sure. But anything that acids like vinegar and lemon will extend its longevity. 

Also, the more air in the container the quicker it will spoil. Therefore, it would be prudent to start with a container barely fits all of the mayo. Then 1/2 of the mayo has been consumed transfer to a smaller container. 

Below is a link to the procedural video. Please ensure that whenever you use an immersion blender make sure that you unplug it before you try to recover any of the mayo from around the blade. 

Chef John @ Foodwishes.com

Sunday, January 25, 2009

The Bread Cube Thermometer

In lieu of an instant-read thermometer to gauge the oil’s temperature, place a fresh (not dry) bread cube in the oil and start heating; when the bread is deep golden brown, the oil is ready.

Saturday, December 6, 2008

Classic Tuna Salad (inspired by Cooks Illustrated) Recipe

Classic Tuna Salad

2 (6-ounce) cans solid white tuna in water

2 tablespoons lemon juice

1/2 teaspoon table salt

1/4 teaspoon ground black pepper

1/2 teaspoon Dill Weed

2 tablespoons minced red onion

2 tablespoons chopped pickles (sweet or dill)

1/2 small clove garlic , minced or pressed through garlic press (about 1/8 teaspoon)

2 tablespoons minced fresh parsley leaves

1/2 cup mayonnaise

1/4 teaspoon Dijon mustard

Barr's Homemade Mayo - It's easy to make

Saturday, November 22, 2008

Egg Salad Recipe

Egg Salad

Makes 2 1/2 cups, enough for 4 sandwiches.

Ingredients
6 large eggs
1/4 cup mayonnaise
2 tablespoons minced red onion
1 tablespoon minced fresh parsley leaves
1/2 medium stalk celery , chopped fine (about 3 tablespoons)
2 teaspoons Dijon mustard
2 teaspoons lemon juice
1/4 teaspoon table salt
Ground black pepper
Instructions

1. Do NOT boil your eggs because this will make it more difficult to remove the shell. You need to steam the eggs in a steamer or in a pot with no more than an inch of water in the pot. Place your eggs in the water and turn up the temp to medium high and place a cover over the pot but tilted so the steam can escape. After about 10 minutes remove the lid and fill the pot with cold water to stop the cooking process. You may need to try this a few times to see what works best for you.

2. After the eggs have cooled a bit, gently crack the shell on the side of a hard surface and remove the shell while submerged in the water filled pot.

2. Mix all ingredients together in medium bowl, including pepper to taste. Serve. (Can be covered and refrigerated overnight.)


Barr's Homemade Mayo - It's easy to make

Saturday, November 8, 2008

Blue Cheese (bleu cheese) Dressing

1/2 Cup Mayonnaise
1/2 Cup Sour Cream

1/2 tsp salt
1/2 tsp pepper
1/2 tsp garlic powder
1 tsp lemon juice
3 Ounces Blue Cheese

To make this recipe really work I suggest that you combine all of the ingredients into a bowl and then, using a grater, add in some cheese, stir, add in more cheese and repeating until there is no more cheese.  This will make a smooth creamy sauce and not leaving you wanting for a chunk of cheese to bite into simply to get that blue cheese flavor.

Cover and refrigerate for at least 2 hours. 

Barr's Homemade Mayo - It's east to make